How to Use S3 as Source or Sink in Hue
On this page, we demonstrate how to write to, and read from, an S3 bucket in Hue.
Continue reading:
Populate S3 Bucket
In this section, we use open data from the U.S. Geological Survey.
- Download 30 days of earthquake data (all_month.csv) from the USGS (~2 MB).
- Log on to the Hue Web UI from Cloudera Manager.
- Select .
- Click , name it "quakes_<any unique id>" and click
Create.
 Tip: Unique bucket names are important per S3 bucket naming conventions.
 - Navigate into the bucket by clicking the bucket name.
- Click , name it "input" and click Create.
- Navigate into the directory by clicking the directory name.
- Click Upload and select, or drag, all_month.csv. The path is s3a://quakes/input/all_month.csv.
 Important: Do not add anything else to the "input" directory–no extra files, no
directories.
Create Table with S3 File
- Go to the Metastore Manager by clicking .
- Create a new table from a file by clicking
 .
. - Enter a Table Name such as "earthquakes".
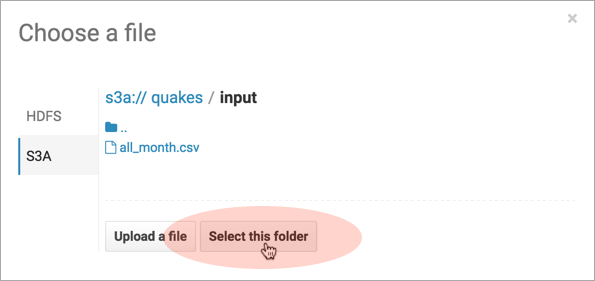
- Browse for the Input Directory, s3a://quakes/input/, and click Select this folder.

- Select Create External Table from the Load Data menu and click Next.
- Delimit by Comma(,) and click Next.
- Click Create Table.
- Click Browse Data
 to automatically generate a SELECT query in the Hive editor:
SELECT * FROM `default`.`earthquakes` LIMIT 10000;
Export Query Results to S3
- Run and Export Results in Hive
- Run the query by clicking Execute
 .
. - Click Get Results
 .
. - Select Export to open the Save query result dialog.


- Run the query by clicking Execute
- Save Results as Custom File
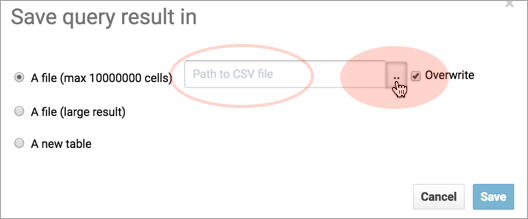
- Select In store (max 10000000 cells) and open the Path to CSV file dialog.
- Navigate into the bucket, s3a://quakes.
- Create folder named, "output."
- Navigate into the output directory and click Select this folder.
- Append a file name to the path, such as quakes.cvs.
- Click Save. The results are saved as s3a://quakes/output/quakes.csv.

- Save Results as MapReduce files
- Select In store (large result) and open the Path to empty directory dialog.
- Navigate into the bucket, s3a://quakes.
- If you have not done so, create a folder named, "output."
- Navigate into the output directory and click Select this folder.
- Click Save. A MapReduce job is run and results are stored in s3a://quakes/output/.

- Save Results as Table
- Run a query for "moment" earthquakes and export:
SELECT time, latitude, longitude, mag FROM `default`.`earthquakes` WHERE magtype IN ('mw','mwb','mwc','mwr','mww'); - Select A new table and input <database>.<new table name>.
- Click Save.
- Click Browse Data
 to view the new table.

- Run a query for "moment" earthquakes and export:
Troubleshoot Errors
This section addresses some error messages you may encounter when attempting to use Hue with S3.
 Tip: Restart the Hue service to view buckets, directories, and files added to your upstream S3 account.
 Tip: Restart the Hue service to view buckets, directories, and files added to your upstream S3 account.
- Failed to access path
Failed to access path: "s3a://quakes". Check that you have access to read this bucket and that the region is correct.
Possible solution: Check your bucket region:- Log on to your AWS account and navigate to the S3 service.
- Select your bucket, for example "quakes", and click Properties.
- Find your region. If it says US Standard, then region=us-east-1.
- Update your configuration in Hue Service Advanced Configuration Snippet (Safety Valve) for hue_safety_valve.ini.
- Save your changes and restart Hue.
-
The table could not be created
The table could not be created. Error while compiling statement: FAILED: SemanticException com.cloudera.com.amazonaws.AmazonClientException: Unable to load AWS credentials from any provider in the chain.
Possible solution: Set your S3 credentials in Hive core-site.xml:- In Cloudera Manager, go to .
- Filter by .
- Set your credentials in Hive Service Advanced Configuration Snippet (Safety Valve) for core-site.xml.
- Click the
 button and input Name and Value for
fs.s3a.AccessKeyId.
 - Click the
 button and input Name and Value for
fs.s3a.SecretAccessKey.
- Click the
- Save your changes and restart Hive.
-
The target path is a directory
Possible solution: Remove any directories or files that may have been added to s3a://quakes/input/ (so that all_month.csv is alone).
-
Bad status for request TFetchResultsReq … Not a file
Bad status for request TFetchResultsReq(...): TFetchResultsResp(status=TStatus(errorCode=0, errorMessage='java.io.IOException: java.io.IOException: Not a file: s3a://Not a file: s3a://quakes/input/output' ...
Possible solution: Remove any directories or files that may have been added to s3a://quakes/input/ (so that all_month.csv is alone). Here, Hive cannot successfully query the earthquakes table (based on all_month.csv) due to the directory, s3a://quakes/input/output.
 Tip: Run tail -f against the Hive server log in: /var/log/hive/.
Page generated August 29, 2019.
| << How to Use Governance-Based Data Discovery | ©2016 Cloudera, Inc. All rights reserved | Hue Administration >> |
| Terms and Conditions Privacy Policy |